---
title: Site Cancellation Procedure (Version 8.x.x Tomcat Sites Only)
description: This article will walk you through the cancellation procedures for sites on the version 8 build hosted on Tomcat application servers
---
[Skip to content](https://knowledge.teamkeeper.com/clockwise-site-cancellation-version-8.x.x-tomcat-sites-only#main-content)
English
Show submenu for translations
/teamkeepr_logo.png?width=191&height=45&name=teamkeepr_logo.png)
Open main navigation
Close main navigation
- English
Show submenu for translations
- Contact us
Contact us
How can we help you?
- There are no suggestions because the search field is empty.
1. [Help Center](https://knowledge.teamkeeper.com/?hsLang=en)
2. [Customer Sites](https://knowledge.teamkeeper.com/customer-sites?hsLang=en)
# Site Cancellation Procedure (Version 8.x.x Tomcat Sites Only)
## This article will walk you through the cancellation procedures for sites on the version 8 build hosted on Tomcat application servers
For sitename editing purposes, open the following Word document:
**[Version 8 Site Cancellation Tomcat Only](https://knowledge.teamkeeper.com/hubfs/Knowledge%20Base/Site%20Cancellation%208.x.x%20Tomcat%20Sites%20Only.docx?hsLang=en)**
Use **Ctrl+H** AND REPLACE ALL INSTANCES OF THE WORD: **sitename-online** with the site’s domain in this document. Also, replace the date 00/00/0000 with a date one month from the preferred cancellation or contract end date (see Billing)
Send the Customer the cancellation email from this article(Edit the article as needed based on the cancellation and customer’s notes):
*https://knowledge.goclockwise.com/cancellation-email-template*
This will give the customer the opportunity to decide what they want to do with their data before the site is taken down.
**CANCELLATION STEPS**:
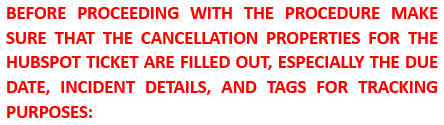
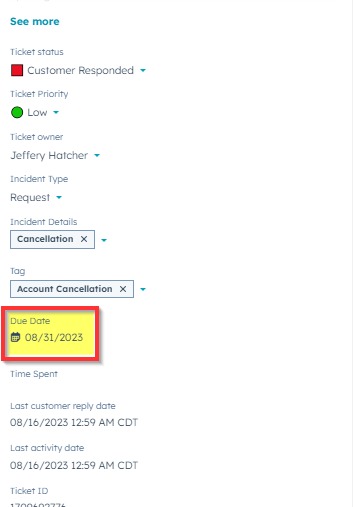
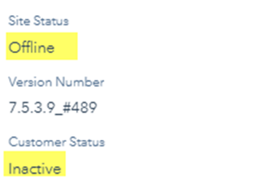
**Make the Customer Site Inactive in HubSpot**
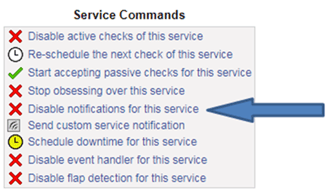
**Disable Nagios Notifications**
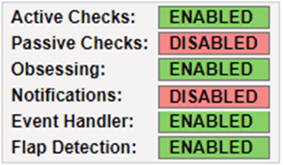
**Backup the Database in SQL**
1. Log in to the database server that the database is hosted on.
2. In the object explorer window on the left find the database you need to backup.
3. Right-click the database \> \[Tasks\] \> \[Back up...\]
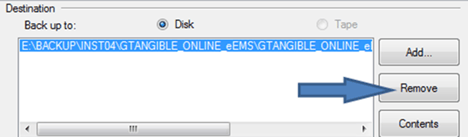
4. In the destination box, there should be a default location. We will need to remove this and add the correct location.
1. Select the default location and click \[Remove\]
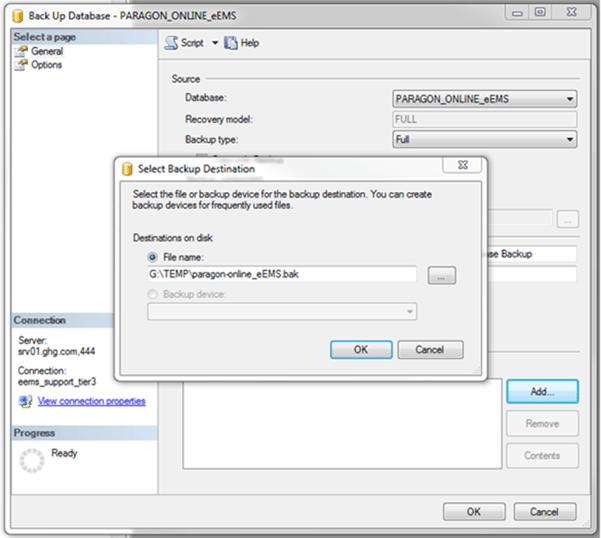
2. Click \[Add...\] a text box for the location will appear. Enter the following location (Remember to replace sitename-online, and 00000000)
`G:\Temp\SITENAME-ONLINE_ONLINE_eEMS00000000.bak`
3. Click \[OK\]
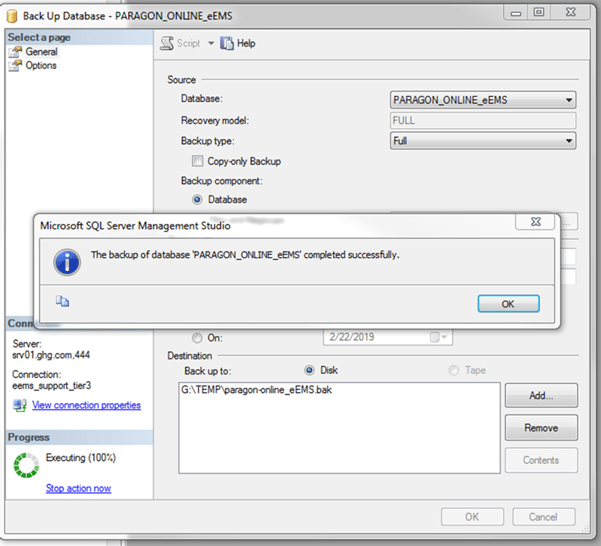
5. Click \[OK\] again to begin the backup process.
1. If a dialog box appears claiming that it cannot verify the existence of the location just click \[OK\] to continue.
*Sample screenshots of the process:*
**Shutdown Site**
Open a Putty session for the application server the site is running on and run the following command in Putty:
`sudo cwctl stop sitename-online`
**Delete Site Files From Server**
Run the following command to delete the site files form the server.
`sudo cwctl deletesite sitename-online`
``
**Remove the Site from the Tomcat File**
1. In Putty, run: `sudo vi /etc/init.d/tomcat`
2. Use your arrow keys to move the cursor to the line that has the tomcat script for the customer’s site
3. Press “**d**” twice (this will remove the line).
4. Press the Shift and colon keys at the same time (Shift + :) to advance to the bottom field of the file.
5. Type `wq`
6. Press **Enter**.
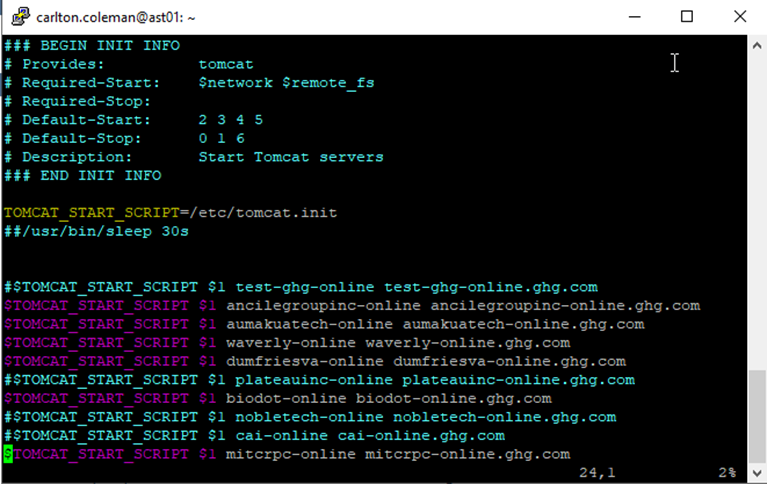
Sample screenshots of the Tomcat file (Blue entries show commented-out sites):
**Notify Manager to Remove the File From Public Domain**
Send a Teams message to Ethan letting him know which sites you have taken down so he can remove them from the Azure servers and DNS.
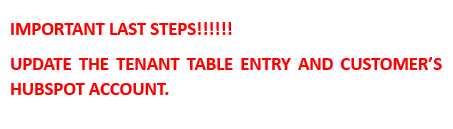
**Update the Tenant Table**
- In SQL, connect to the **ds01.teamkeeper.com,442** database server.
- Expand **Databases** and navigate to and expand the **TKBILLING** database.
- Expand **Tables**.
- Right-click **dbo.Tenant** and click **Edit Top 200 Rows**.
- Click **Show Criteria Pane** (or press Ctrl + 2) and type in `sitename-online` under the Filter row for the sub-domain column.
- Change the status to “Deleted” and press Enter.
**Update the customer's HubSpot account**
- Go to the Cancellation Ticket (HubSpot).
- Update the site status from Active to Inactive
- Close the Ticket.
**Add the cancellation form as a PDF in SharePoint**
- **[Cancellation Forms SharePoint](https://harriscomputernam.sharepoint.com/:f:/r/sites/LocalGov/CS/Shared%20Documents/Contracts/TeamKeeper/Cancellation%20Forms?csf=1&web=1&e=lzX7z8)**
Note: This file location is limited to managers and team leads
**Check If Customer is Using QuickBooks Online (QBO)**
Every time TeamKeeper customer was using QBO will need to be removed from the list of accounts for TeamKeeper. Check with billing to verify this.
- [Business Rule Management](https://knowledge.teamkeeper.com/business-rule-management?hsLang=en)
- [CLOCKS - ATS](https://knowledge.teamkeeper.com/clocks-ats?hsLang=en)
- [Configuration](https://knowledge.teamkeeper.com/configuration?hsLang=en)
- [Customer Sites](https://knowledge.teamkeeper.com/customer-sites?hsLang=en)
- [DCAA Compliance](https://knowledge.teamkeeper.com/dcaa-compliance?hsLang=en)
- [Employee Management](https://knowledge.teamkeeper.com/employee-management?hsLang=en)
- [Genus Clocks](https://knowledge.teamkeeper.com/genus-clocks?hsLang=en)
- [GMS Notes](https://knowledge.teamkeeper.com/gms-notes?hsLang=en)
- [Guides and Pieces](https://knowledge.teamkeeper.com/guides-and-pieces?hsLang=en)
- [Help Guides](https://knowledge.teamkeeper.com/help-guides?hsLang=en)
- [Imports Exports](https://knowledge.teamkeeper.com/imports-exports?hsLang=en)
- [Leave](https://knowledge.teamkeeper.com/leave?hsLang=en)
- [Login](https://knowledge.teamkeeper.com/login?hsLang=en)
- [MFA - Multi Factor Authentication](https://knowledge.teamkeeper.com/mfa-multi-factor-authentication?hsLang=en)
- [Mobile App](https://knowledge.teamkeeper.com/mobile-app?hsLang=en#main-content)
- [Android](https://knowledge.teamkeeper.com/mobile-app?hsLang=en#android)
- [Notifications](https://knowledge.teamkeeper.com/notifications?hsLang=en)
- [Prepopulation](https://knowledge.teamkeeper.com/prepopulation?hsLang=en)
- [QuickBooks Knowledge](https://knowledge.teamkeeper.com/quickbooks-knowledge?hsLang=en)
- [QuickBooks](https://knowledge.teamkeeper.com/quickbooks?hsLang=en)
- [Questions / Inquiries](https://knowledge.teamkeeper.com/questions-inquiries?hsLang=en)
- [Reports](https://knowledge.teamkeeper.com/reports?hsLang=en)
- [Task Management](https://knowledge.teamkeeper.com/task-management?hsLang=en)
- [TeamKeeper Components](https://knowledge.teamkeeper.com/teamkeeper-components?hsLang=en)
- [TeamKeeper End User](https://knowledge.teamkeeper.com/teamkeeper-end-user?hsLang=en#main-content)
- [W2](https://knowledge.teamkeeper.com/teamkeeper-end-user?hsLang=en#w2)
- [Training Employee Guides](https://knowledge.teamkeeper.com/training-employee-guides?hsLang=en)
- [User Guides](https://knowledge.teamkeeper.com/user-guides?hsLang=en)
- [W2 Forms](https://knowledge.teamkeeper.com/w2-forms?hsLang=en)
- [Timesheet Data Backup Options](https://knowledge.teamkeeper.com/timesheet-data-backup-options?hsLang=en)
- [Version Release Notes](https://knowledge.teamkeeper.com/version-release-notes?hsLang=en)
# TeamKeeper
[mailto:email@email.com](mailto:email@email.com)
Copyright © 2026, TeamKeeper